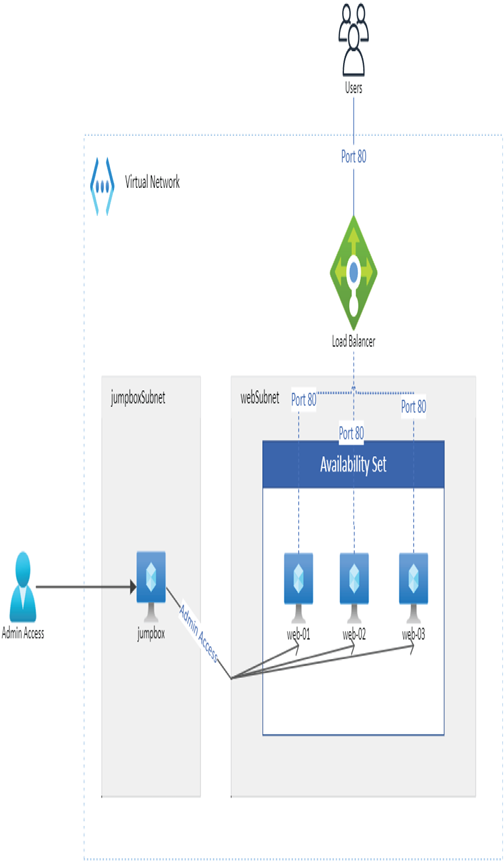
You will be creating an architecture similar to the one in Figure 5.7.
You can use the PowerShell script here:
https://github.com/rithinskaria/azure-infra/blob/main/loadbalancing.ps1
to create the virtual networks, subnet, availability set, jumpbox VM, and web servers. If needed, you can manually deploy each of the resources. Since the idea here is to deploy the load balancer, it would be better to write a script to deploy the rest of the resources. If you used the PowerShell script, the script would display the FQDN of the jumpbox VM and the private IP addresses of the web servers once the deployment is completed. Instead of jumpbox, you could also deploy a Bastion host.
See Exercise 5.1.

FIGURE 5.7 Configuring the load balancer, reference architecture
EXERCISE 5.1
Implementing Load Balancing in Azure
- If you have successfully run the PowerShell script, all resources will be deployed. SSH to the jumpbox using the public IP address/FQDN of the VM.
- Once you are in the jumpbox VM and run the command nano script.sh, this will open the nano text editor and you have to paste the following script:
#!/bin/bash
sudo apt update -y
sudo apt install sshpass -y
sshpass -p “VMP@55w0rd” ssh -o StrictHostKeyChecking=no
[email protected] <<EOF
sudo apt install apache2 -y
sudo chmod -R -v 777 /var/www/
sudo echo “Hello from web-01”> /var/www/html/index.html
exit
EOF
sshpass -p “VMP@55w0rd” ssh -o StrictHostKeyChecking=no [email protected] <<EOF
sudo apt install apache2 -y
sudo chmod -R -v 777 /var/www/
sudo echo “Hello from web-02”> /var/www/html/index.html
exit
EOF
sshpass -p “VMP@55w0rd” ssh -o StrictHostKeyChecking=no [email protected] <<EOF
sudo apt install apache2 -y
sudo chmod -R -v 777 /var/www/
sudo echo “Hello from web-03”> /var/www/html/index.html
exit
EOF
- After pasting the script, hit Ctrl+X, press y, and then Enter to save the file. If you have changed the username and password in the PowerShell script, then you have to update the Bash script with the correct username and password for all three sshpass commands. This script will SSH to our web servers and update the index.html file with a hello message. You will also append the name of the VM to the hello message so that you can understand which VM gave the response.
- Run chmod +x script.sh to add the execute permission and then ./script.sh to run the script. Your environment is completely set up now, and you can deploy the load balancer. If you are not familiar with Bash scripts, then you can manually SSH to each machine and install the Apache Server.
- Navigate to the Azure portal and search for Load Balancer. Click Create. In the initial screen, you will be asked to provide the following inputs:
- Subscription: Select the subscription.
- Resource Group: Select the resource group.
- Name: Set the name of the load balancer.
- Region: Choose a region for the load balancer. Make sure that you select the same region where your web servers are deployed.
- Type: Internal or Public. Since you are load balancing the requests from the Internet, you need to select Public.
- SKU: Standard or Basic. You will go with the default option Standard.
- Tier: Regional or Global; go with the default option.
Leave a Reply